How do I charge my Philips groomer, trimmer or clipper?
Published on 27 June 2025
Charge your Philips groomer, clipper or trimmer before using it for the first time and charge it regularly to ensure that it's always ready for your next trim.
Refer to the information below to find out how to charge your product. For specific charging times for your device, refer to the user manual provided or search your model number hereto find the manual online.
If you need to purchase a replacement charger for your Philips product, you can find it here.
Tips for understanding usage instructions
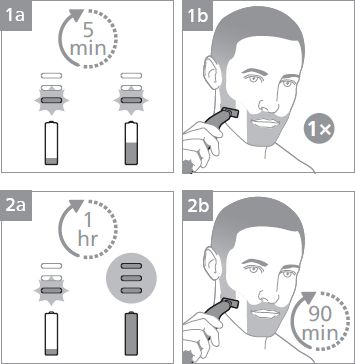
Some Philips grooming products come with a pictorial user manual. The example below indicates one way that such a user manual explains charging and usage times for a product.
1a and 1b indicate that the product has a quick charge function, meaning that a 5 minute charge provides enough battery life for one shave.
2a and 2b indicate that the battery will be fully charged after 1 hour of charging and this will provide 90 minutes of shaving time.
These principles can be used to understand the pictorial user manual for your product.
USB charging cable
Some Philips products include a USB charging cable. This cable can be connected to a power outlet (plug socket) using an adapter such as the Philips HQ87 (classified as IPX4, meaning it's splash-proof and safe to use in a moist environment such as a bathroom). An adapter from any other reputable brand can also be used to charge the product, provided that it has an output of 5 V and 1 A or higher (always follow safety precautions specified by the manufacturer).
Note: The charging times indicated in the user manual for your product are based on charging using this method. If you charge your product using another power source (e.g. a laptop USB port) the charging time may be considerably longer.
Charger with a plug
If your Philips product comes with a charger with an integrated power outlet plug, simply insert the small plug on the end of the charging cable into your Philips groomer and then connect the charger to the power outlet.
Charging stand
If a charging stand is provided with your Philips product, or if you've purchased a compatible charging stand for your device, you can connect it to the power source using the charger or cable provided with your Philips product.
For example, if your Philips product was provided with a USB charging cable, you can plug it into the device itself or into the charging stand. Refer to the information above for more information about USB charging, which is also applicable to charging with a charging stand.
Battery-operated devices
Some Philips grooming devices run on disposable AA batteries. If your trimmer does not switch on or runs more slowly than before, it's time to replace the batteries.
Only use the disposable batteries specified in the user manual. Do not mix different types of batteries or new and used batteries. When putting in new batteries, make sure that the + and - poles of the battery point in the right direction.
By clicking on the link, you will be leaving the official Royal Philips ("Philips") website. Any links to third-party websites that may appear on this site are provided only for your convenience and in no way represent any affiliation or endorsement of the information provided on those linked websites. Philips makes no representations or warranties of any kind with regard to any third-party websites or the information contained therein.